Object Detection on KITTI dataset using YOLO and Faster R-CNN
This post is going to describe object detection on KITTI dataset using three retrained object detectors: YOLOv2, YOLOv3, Faster R-CNN and compare their performance evaluated by uploading the results to KITTI evaluation server.
Note that there is a previous post about the details for YOLOv2 (click here). YOLOv3 implementation is almost the same with YOLOv3, so that I will skip some steps. Please refer to the previous post to see more details.
Prepare KITTI dataset
We used KITTI object 2D for training YOLO and used KITTI raw data for test. Some of the test results are recorded as the demo video above.
Download data and labels
Download KITTI object 2D left color images of object data set (12 GB) and submit your email address to get the download link.
Download training labels of object data set (5 MB). Unzip them to your customized directory <data_dir> and <label_dir>.
Convert KITTI labels
To simplify the labels, we combined 9 original KITTI labels into 6 classes:
Car
Van
Truck
Tram
Pedestrian
Cyclist
Be careful that YOLO needs the bounding box format as (center_x, center_y, width, height),
instead of using typical format for KITTI.
YOLO configurations
YOLO source code is available here.
To train YOLO, beside training data and labels, we need the following documents:
kitti.data, kitti.names, and kitti-yolovX.cfg.
The data and name files is used for feeding directories and variables to YOLO.
The configuration files kittiX-yolovX.cfg for training on KITTI is located at
- YOLOv2:
/darknet/cfg/kitti6-yolov2.cfg - YOLOv3:
/darknet/cfg/kitti6-yolov3.cfg
Details of configurations
Open the configuration file yolovX-voc.cfg and change the following parameters:
[net]
# Training
batch=64
subdivisions=8
height=370
width=1224

[region]
classes=6

random=0  # remove resizing step
Note that I removed resizing step in YOLO and compared the results. The reason for this is described in the previous post.
Also, remember to change the filters in YOLOv2’s last convolutional layer
to be \(\texttt{filters} = ((\texttt{classes} + 5) \times \texttt{num})\), so that
# last convolutional layer
[convolutional]
filters=55
For YOLOv3, change the filters in three yolo layers as
\(\texttt{filters} = ((\texttt{classes} + 5) \times 3)\), so that
# do the same thing for the 3 yolo layers
[convolutional]
filters=33
You can also refine some other parameters like learning_rate, object_scale, thresh, etc. to obtain even better results.
Faster R-CNN Configurations
To train Faster R-CNN, we need to transfer training images and labels as the input format for TensorFlow
called tfrecord (using TensorFlow provided the scripts).
Typically, Faster R-CNN is well-trained if the loss drops below 0.1.
After the model is trained, we need to transfer the model to a frozen graph defined in TensorFlow
to do detection inference.
For testing, I also write a script to save the detection results including quantitative results and
images with detected bounding boxes.
For this part, you need to install TensorFlow object detection API and I write some tutorials here to help installation and training.
Firstly, we need to clone tensorflow/models from GitHub and install this package according to the
official installation tutorial.
After the package is installed, we need to prepare the training dataset, i.e.,
converting dataset to tfrecord files:
python object_detection/dataset_tools/create_kitti_tf_record.py \
    --data_dir=<dataset-root>/object_2d \
    --output_path=/mnt/disk1/kitti-dataset/object_2d/faster-rcnn/kitti \
    --classes_to_use=car ,van ,truck ,pedestrian ,cyclist ,tram ,dontcare \
    --label_map_path=/mnt/disk1/kitti-dataset/object_2d/faster-rcnn/kitti_label_map.pbtxt
Then, start to train Faster R-CNN:
python object_detection/legacy/train.py \
    --train_dir=<tensorflow-dir>/models/ \
    --pipeline_config_path=<object-detection-api-dir>/samples/configs/faster_rcnn_resnet101_kitti.config \
When training is completed, we need to export the weights to a frozengraph:
python object_detection/export_inference_graph.py \
    --input_type=image_tensor \
    --pipeline_config_path=<object-detection-api-dir>/samples/configs/faster_rcnn_resnet101_kitti.config \
    --trained_checkpoint_prefix=<checkpoint-dir>/model.ckpt-58093 \
    --output_directory=<graph-dir>/graph
Finally, we can test and save detection results on KITTI testing dataset using the demo
written in Jupyter Notebook: fasterrcnn/objectdetection/objectdetectiontutorial.ipynb.
Evaluation results
For object detection, people often use a metric called mean average precision (mAP)
to evaluate the performance of a detection algorithm.
mAP is defined as the average of the maximum precision at different recall values.
I use the original KITTI evaluation tool and this GitHub repository [1] to calculate mAP
and evaluate the performance of object detection models.
Moreover, I also count the time consumption for each detection algorithms.
Note that the KITTI evaluation tool only cares about object detectors for the classes
Car, Pedestrian, and Cyclist but do not count Van, etc. as false positives for cars.
Quantitative results for YOLOv2
The results of mAP for KITTI using original YOLOv2 with input resizing.
| Benchmark | Easy | Moderate | Hard |
|---|---|---|---|
| Car | 45.32% | 28.42% | 12.97% |
| Pedestrian | 18.34% | 13.90% | 9.81% |
| Cyclist | 8.71% | 5.40% | 3.02% |
The results of mAP for KITTI using modified YOLOv2 without input resizing.
| Benchmark | Easy | Moderate | Hard |
|---|---|---|---|
| Car | 88.17% | 78.70% | 69.45% |
| Pedestrian | 60.44% | 43.69% | 43.06% |
| Cyclist | 55.00% | 39.29% | 32.58% |
Quantitative results for YOLOv3
The results of mAP for KITTI using modified YOLOv3 without input resizing.
| Benchmark | Easy | Moderate | Hard |
|---|---|---|---|
| Car | 56.00% | 36.23% | 29.55% |
| Pedestrian | 29.98% | 22.84% | 22.21% |
| Cyclist | 9.09% | 9.09% | 9.09% |
Quantitative results for Faster R-CNN
The results of mAP for KITTI using retrained Faster R-CNN.
| Benchmark | Easy | Moderate | Hard |
|---|---|---|---|
| Car | 84.81% | 86.18% | 78.03% |
| Pedestrian | 76.52% | 59.98% | 51.84% |
| Cyclist | 74.72% | 56.83% | 49.60% |
Qualitative results
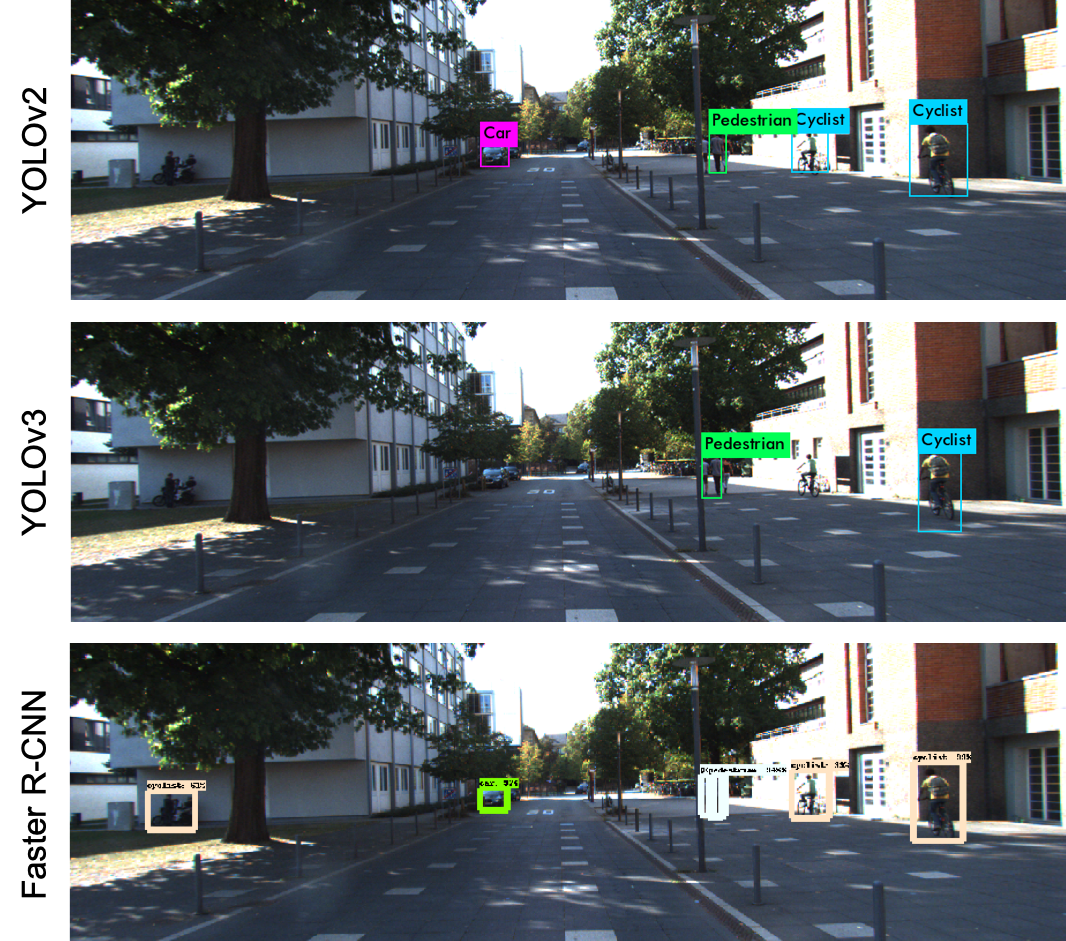
The following figure shows some example testing results using these three models. I select three typical road scenes in KITTI which contains many vehicles, pedestrains and multi-class objects respectively.

The following figure shows a result that Faster R-CNN performs much better than the two YOLO models. In this example, YOLO cannot detect the people on left-hand side and can only detect one pedestrian on the right-hand side, while Faster R-CNN can detect multiple pedestrians on the right-hand side.
Execution time analysis
I also analyze the execution time for the three models. YOLOv2 and YOLOv3 are claimed as real-time detection models so that for KITTI, they can finish object detection less than 40 ms per image. While YOLOv3 is a little bit slower than YOLOv2. However, Faster R-CNN is much slower than YOLO (although it named “faster”). Thus, Faster R-CNN cannot be used in the real-time tasks like autonomous driving although its performance is much better.
| Model | Inference Time (per frame) |
|---|---|
| YOLOv2 | 15 ms |
| YOLOv3 | 35 ms |
| Faster R-CNN | 2763 ms |
BTW, I use NVIDIA Quadro GV100 for both training and testing.
Conclusion
I implemented three kinds of object detection models, i.e., YOLOv2, YOLOv3, and Faster R-CNN, on KITTI 2D object detection dataset. During the implementation, I did the following:
- pre-processed data and labels
- retrained and modified the models
- inferred testing results using retrained models
- evaluated the detection performance
In conclusion, Faster R-CNN performs best on KITTI dataset. However, due to slow execution speed, it cannot be used in real-time autonomous driving scenarios.
deep-learning object-detection kitti yolo faster-rcnn