Jekyll2026-06-05T14:06:37+00:00https://yizhouwang.net/feed.xmlYizhou WangPersonal homepage of Yizhou Wang, Senior Deep Learning Engineer at NVIDIA and Ph.D. in Electrical & Computer Engineering from the University of Washington. Research in computer vision, autonomous driving, 3D perception, multi-object tracking, and sensor fusion.Yizhou Wangjoeyyzwang@gmail.comMonocular Visual Object 3D Localization in Road Scenes2019-07-15T00:00:00+00:002019-07-15T00:00:00+00:00https://yizhouwang.net/blog/2019/07/15/object-3d-localizationThis is a paper published at ACM Multimedia 2019 (Long Oral).
[PDF Available Here]
Problems to Solve
Accurately localize the 3D positions of the objects in videos captured by a camera mounted on an autonomous vehicle.
Adaptively estimate ground plane of each frame for more robust object 3D localization.
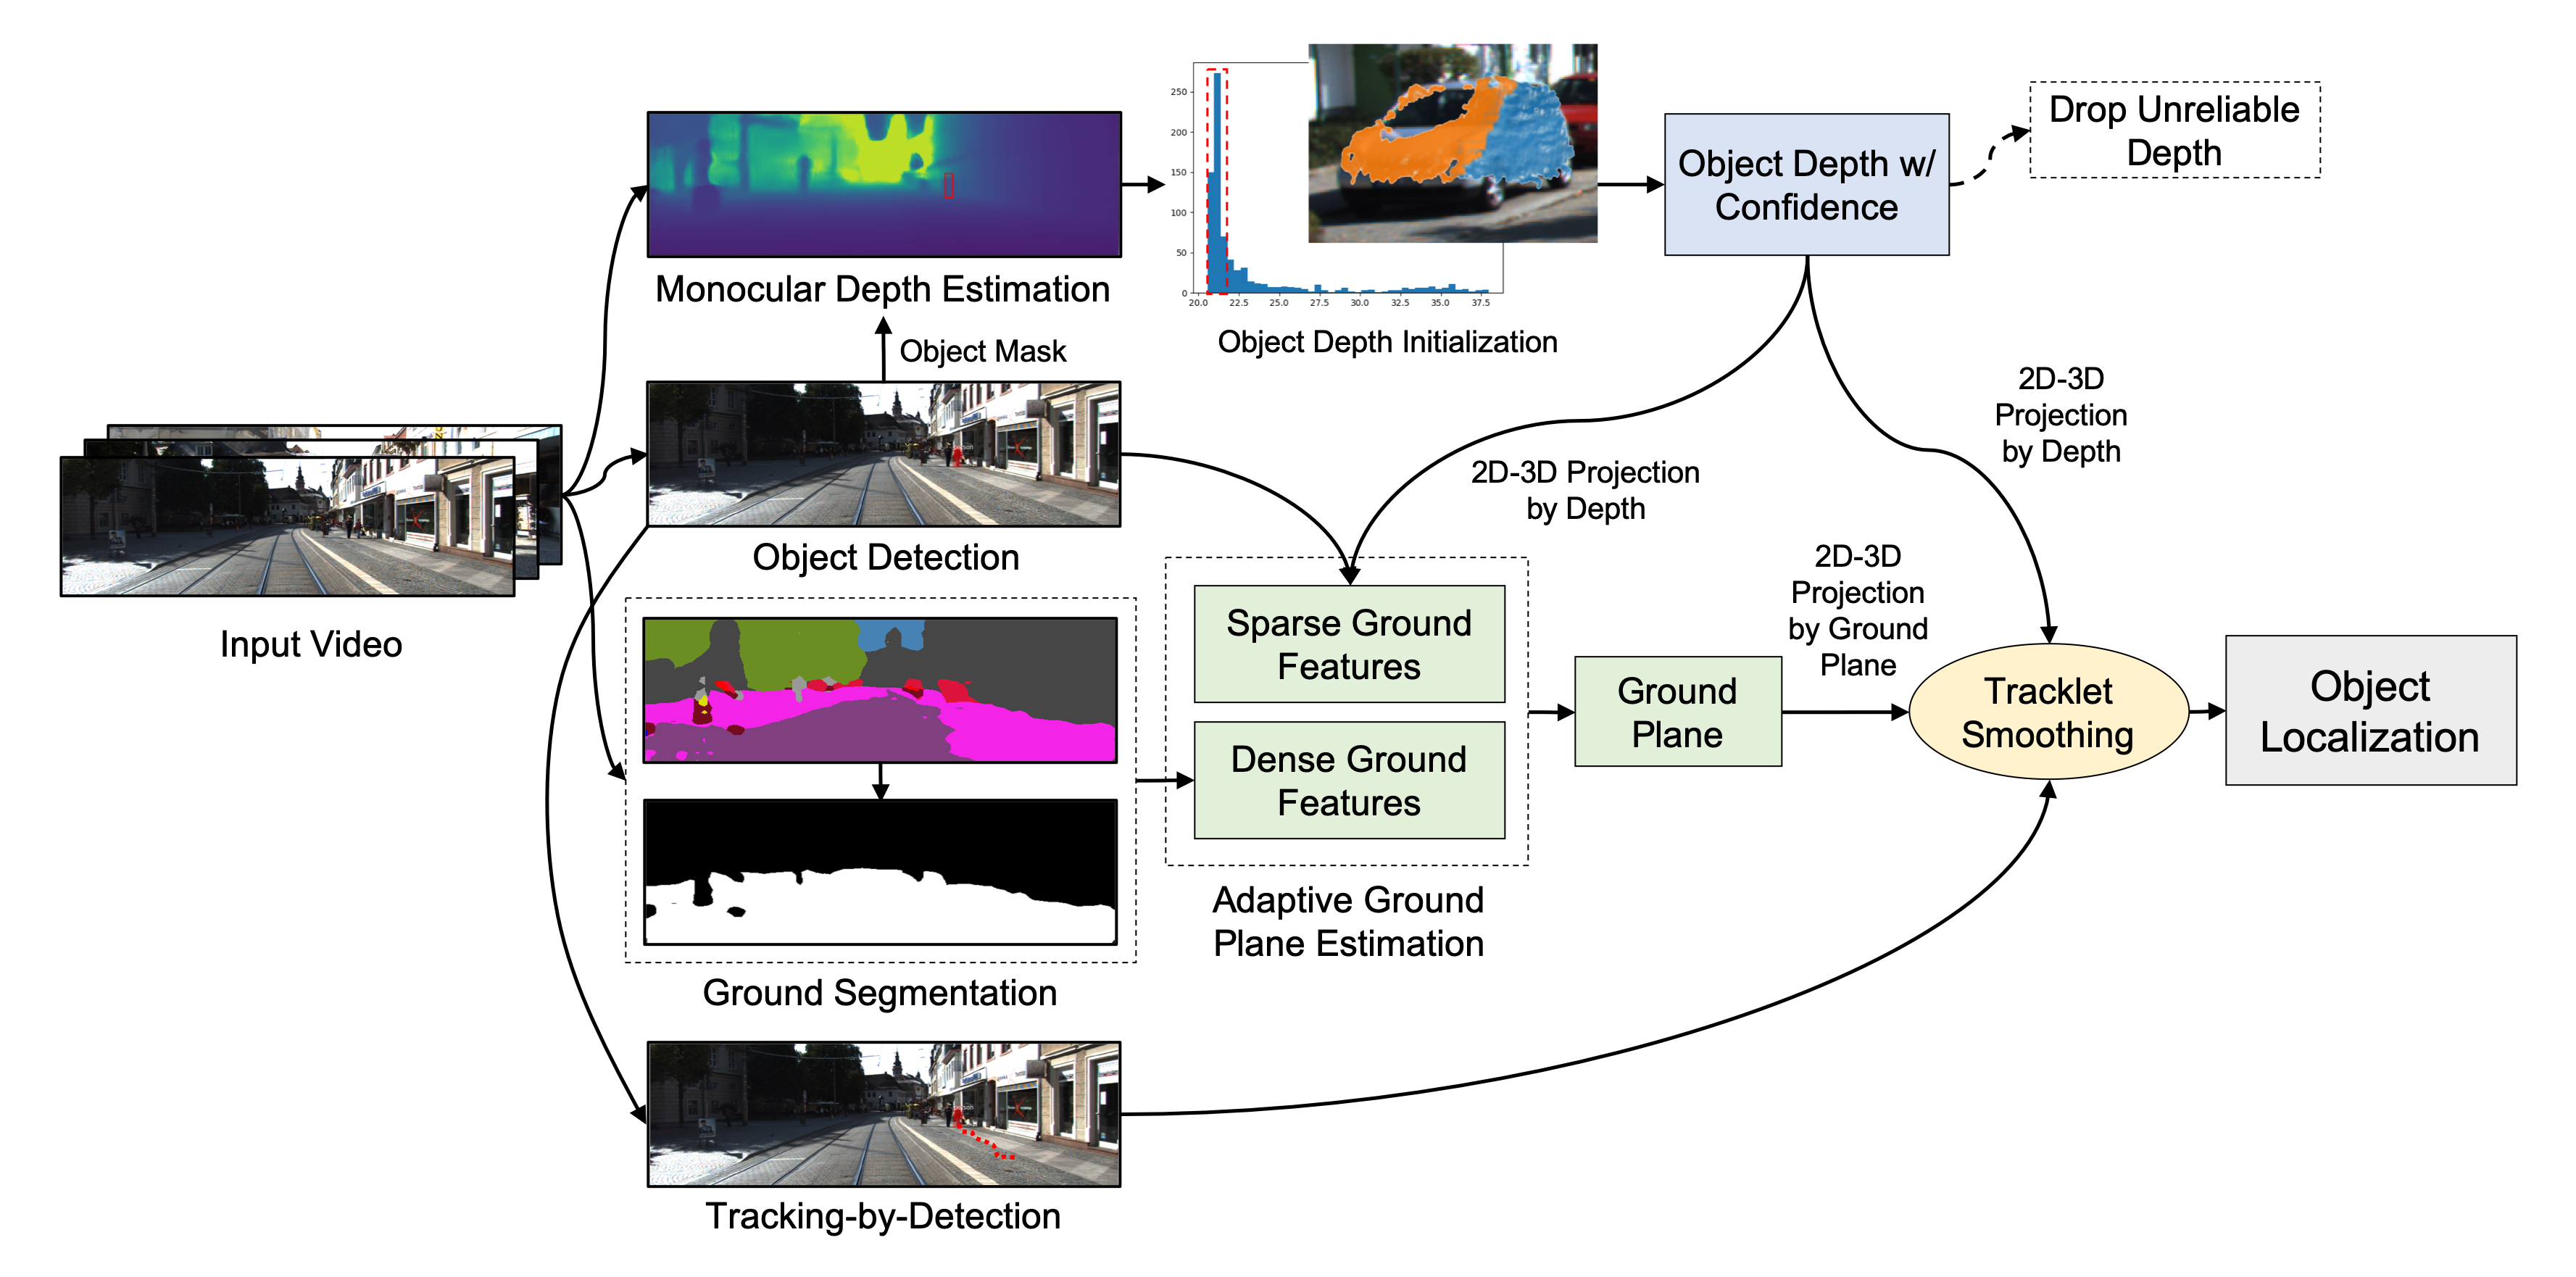
Framework
Monocular depth estimation or other 3D sensors to obtain depth information.
Object depth histogram analysis or 3D point cloud clustering for object depth initialization.
Adaptive ground plane estimation taking advantage of sparse and dense ground features.
Tracklet smoothing using the results from multi-object tracking.
Quantitative Results
Localization error and time complexity for pedestrians localization on KITTI dataset.
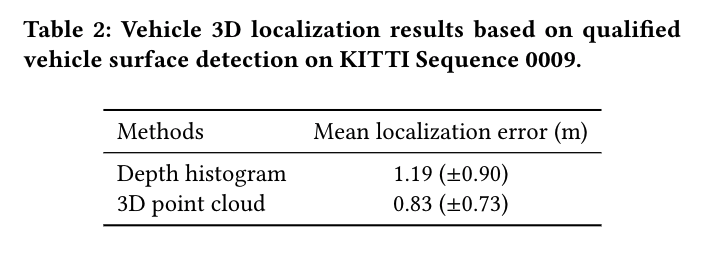
Localization error for vehicle localization on KITTI dataset.
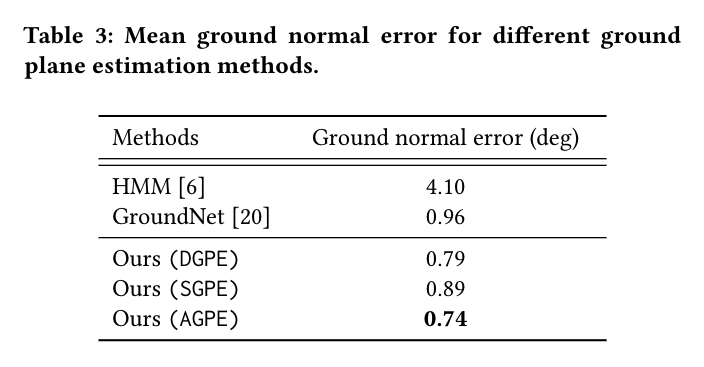
Ground plane estimation results.
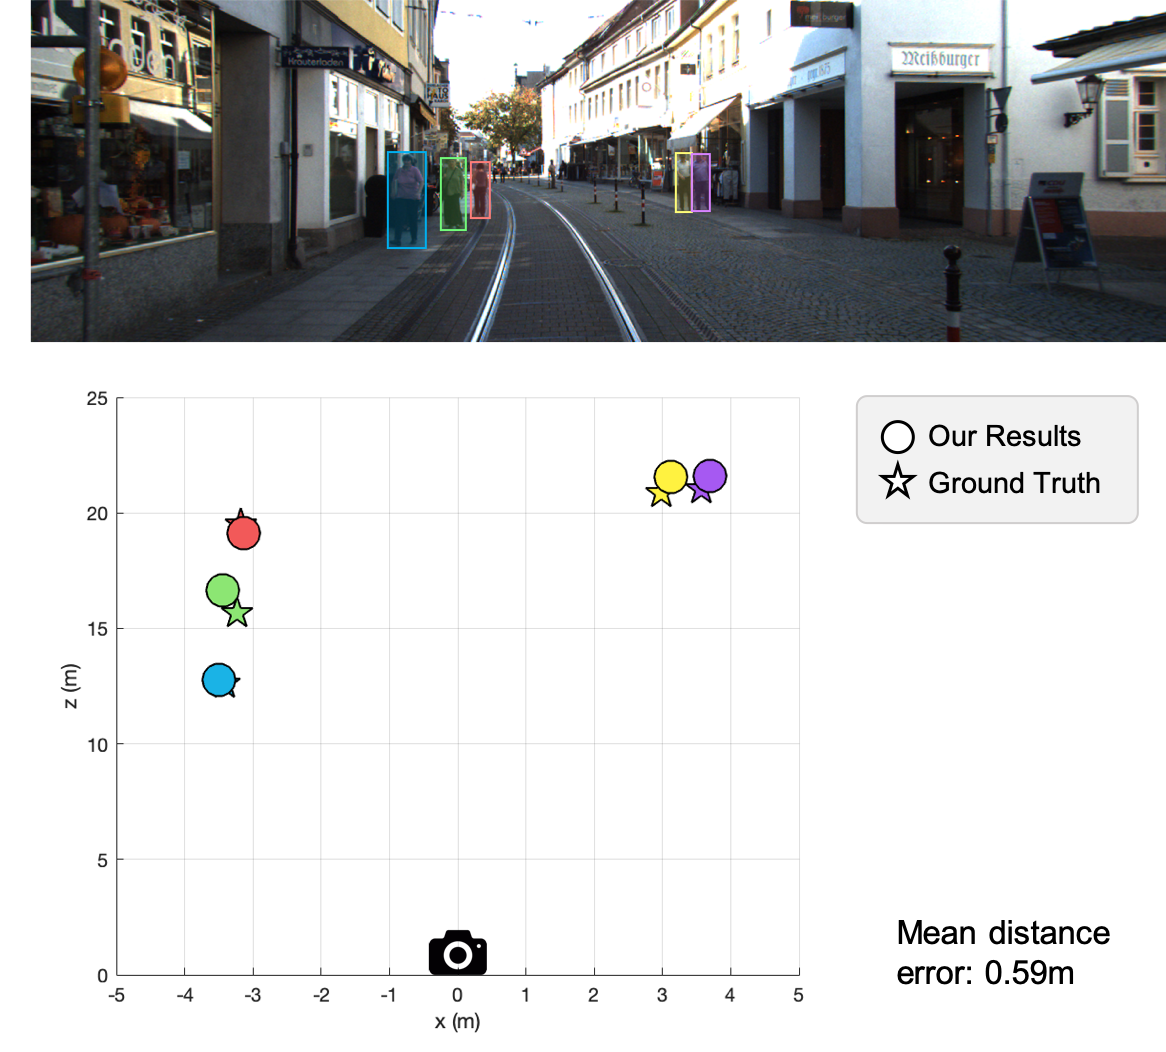
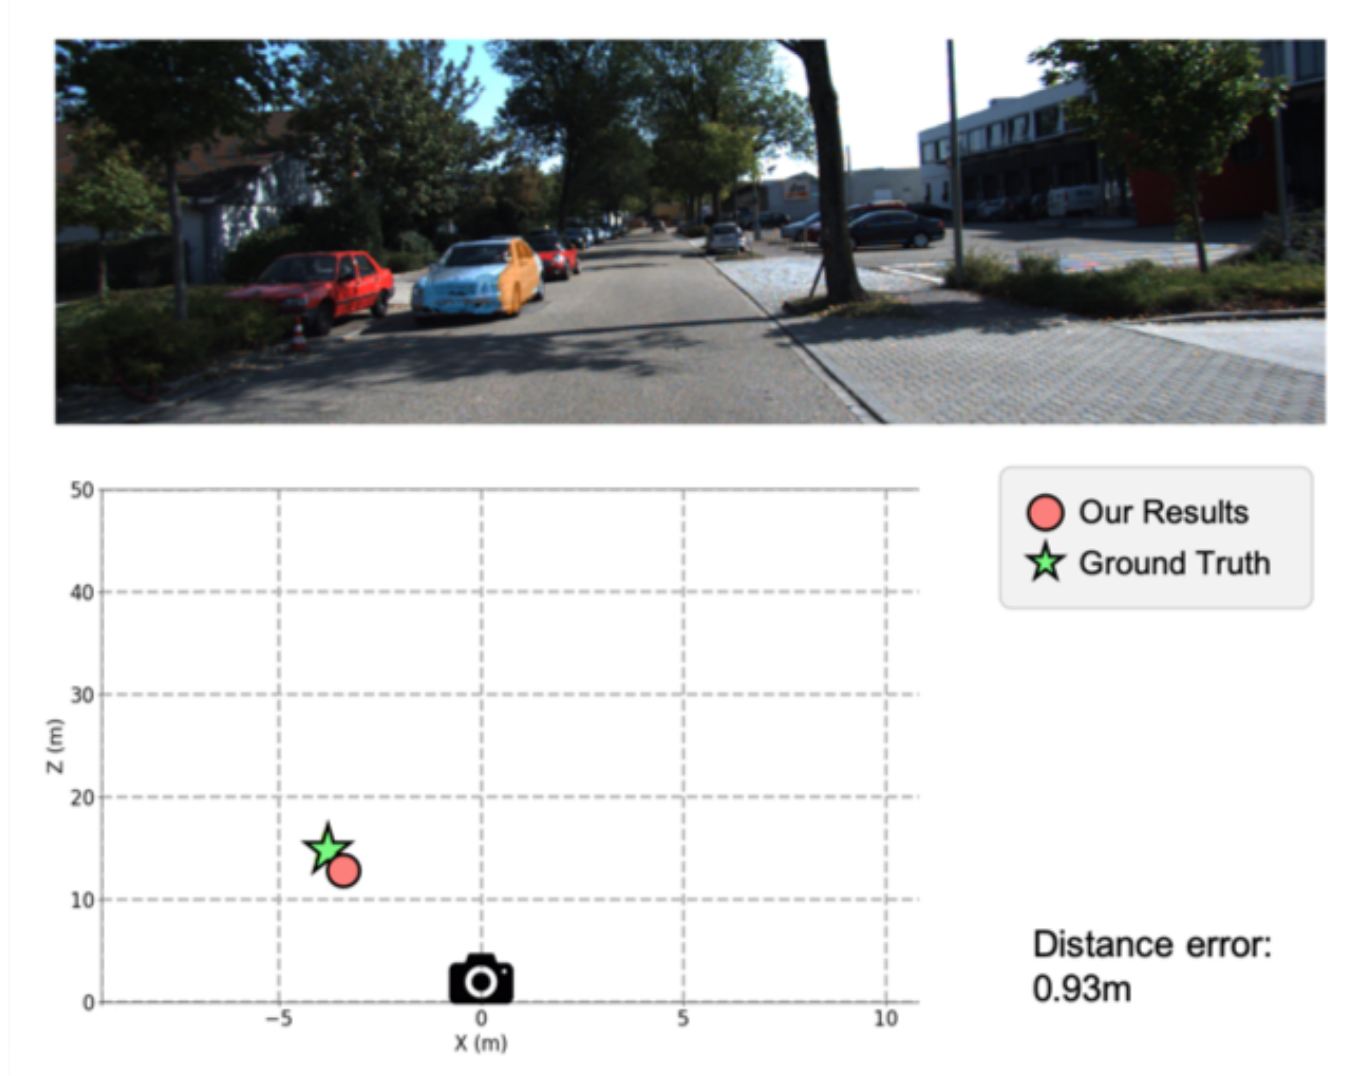
Qualitative Results
Example results for pedestrian and vehicle 3D localization.
Please refer our paper published in ACM Multimedia 2019:
@inproceedings{wang2019monocular,
  title={Monocular Visual Object 3D Localization in Road Scenes},
  author={Wang, Yizhou and Huang, Yen-Ting and Hwang, Jenq-Neng},
  booktitle={Proceedings of the 27th ACM International Conference on Multimedia},
  pages={917--925},
  year={2019},
  organization={ACM}
}
]]>Yizhou Wang, Yen-Ting Huang, Jenq-Neng HwangObject Detection on KITTI dataset using YOLO and Faster R-CNN2018-12-20T00:00:00+00:002018-12-20T00:00:00+00:00https://yizhouwang.net/blog/2018/12/20/object-detection-kittiThis post is going to describe object detection on
KITTI dataset
using three retrained object detectors: YOLOv2, YOLOv3, Faster R-CNN
and compare their performance evaluated by uploading the results to KITTI evaluation server.
Note that there is a previous post about the details for YOLOv2
(click here).
YOLOv3 implementation is almost the same with YOLOv3, so that I will skip some steps.
Please refer to the previous post to see more details.
Prepare KITTI dataset
We used KITTI object 2D for training YOLO and used KITTI raw data for test. Some of the test results are recorded as the demo video above.
To simplify the labels, we combined 9 original KITTI labels into 6 classes:
Car
Van
Truck
Tram
Pedestrian
Cyclist
Be careful that YOLO needs the bounding box format as (center_x, center_y, width, height),
instead of using typical format for KITTI.
YOLO configurations
YOLO source code is available here.
To train YOLO, beside training data and labels, we need the following documents:
kitti.data, kitti.names, and kitti-yolovX.cfg.
The data and name files is used for feeding directories and variables to YOLO.
The configuration files kittiX-yolovX.cfg for training on KITTI is located at
Note that I removed resizing step in YOLO and compared the results.
The reason for this is described in the
previous post.
Also, remember to change the filters in YOLOv2’s last convolutional layer
to be \(\texttt{filters} = ((\texttt{classes} + 5) \times \texttt{num})\), so that
# last convolutional layer[convolutional]filters=55
For YOLOv3, change the filters in three yolo layers as
\(\texttt{filters} = ((\texttt{classes} + 5) \times 3)\), so that
# do the same thing for the 3 yolo layers[convolutional]filters=33
You can also refine some other parameters like learning_rate, object_scale, thresh, etc. to obtain even better results.
Faster R-CNN Configurations
To train Faster R-CNN, we need to transfer training images and labels as the input format for TensorFlow
called tfrecord (using TensorFlow provided the scripts).
Typically, Faster R-CNN is well-trained if the loss drops below 0.1.
After the model is trained, we need to transfer the model to a frozen graph defined in TensorFlow
to do detection inference.
For testing, I also write a script to save the detection results including quantitative results and
images with detected bounding boxes.
For this part, you need to install TensorFlow object detection API
and I write some tutorials here to help installation and training.
Firstly, we need to clone tensorflow/models from GitHub and install this package according to the
official installation tutorial.
After the package is installed, we need to prepare the training dataset, i.e.,
converting dataset to tfrecord files:
Finally, we can test and save detection results on KITTI testing dataset using the demo
written in Jupyter Notebook: fasterrcnn/objectdetection/objectdetectiontutorial.ipynb.
Evaluation results
For object detection, people often use a metric called mean average precision (mAP)
to evaluate the performance of a detection algorithm.
mAP is defined as the average of the maximum precision at different recall values.
I use the original KITTI evaluation tool and this GitHub repository [1] to calculate mAP
and evaluate the performance of object detection models.
Moreover, I also count the time consumption for each detection algorithms.
Note that the KITTI evaluation tool only cares about object detectors for the classes
Car, Pedestrian, and Cyclist but do not count Van, etc. as false positives for cars.
Quantitative results for YOLOv2
The results of mAP for KITTI using original YOLOv2 with input resizing.
Benchmark
Easy
Moderate
Hard
Car
45.32%
28.42%
12.97%
Pedestrian
18.34%
13.90%
9.81%
Cyclist
8.71%
5.40%
3.02%
The results of mAP for KITTI using modified YOLOv2 without input resizing.
Benchmark
Easy
Moderate
Hard
Car
88.17%
78.70%
69.45%
Pedestrian
60.44%
43.69%
43.06%
Cyclist
55.00%
39.29%
32.58%
Quantitative results for YOLOv3
The results of mAP for KITTI using modified YOLOv3 without input resizing.
Benchmark
Easy
Moderate
Hard
Car
56.00%
36.23%
29.55%
Pedestrian
29.98%
22.84%
22.21%
Cyclist
9.09%
9.09%
9.09%
Quantitative results for Faster R-CNN
The results of mAP for KITTI using retrained Faster R-CNN.
Benchmark
Easy
Moderate
Hard
Car
84.81%
86.18%
78.03%
Pedestrian
76.52%
59.98%
51.84%
Cyclist
74.72%
56.83%
49.60%
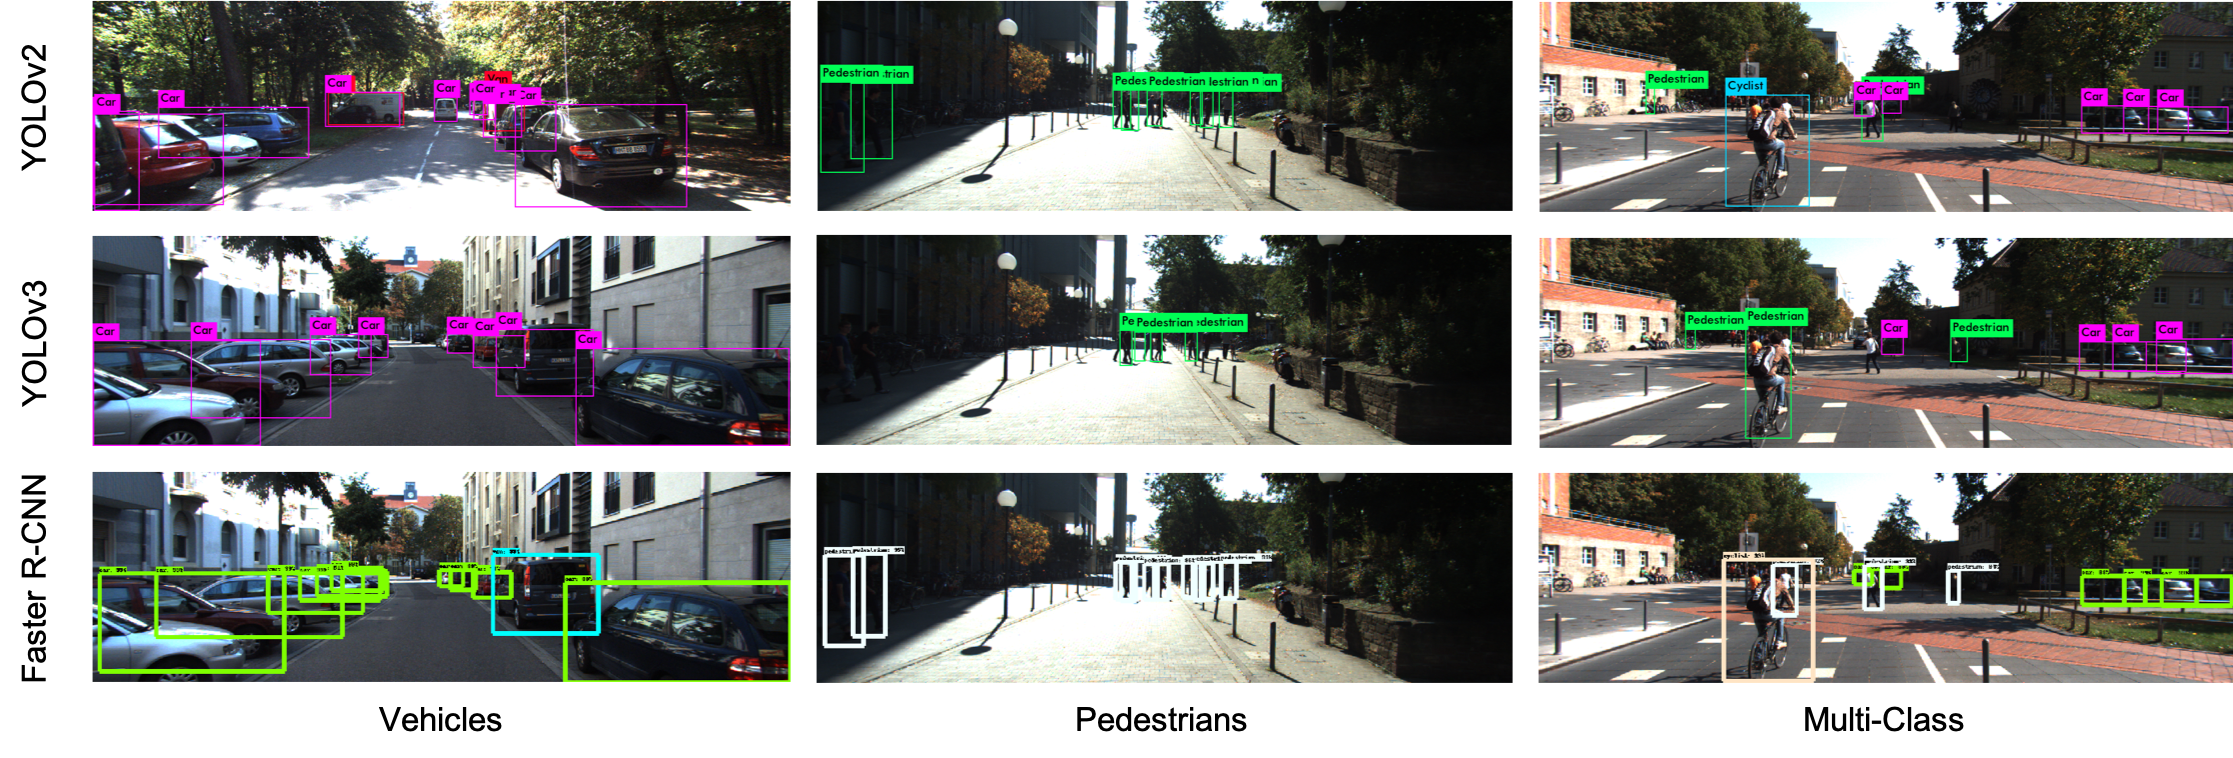
Qualitative results
The following figure shows some example testing results using these three models. I select three typical road scenes in KITTI which contains many vehicles, pedestrains and multi-class objects respectively.
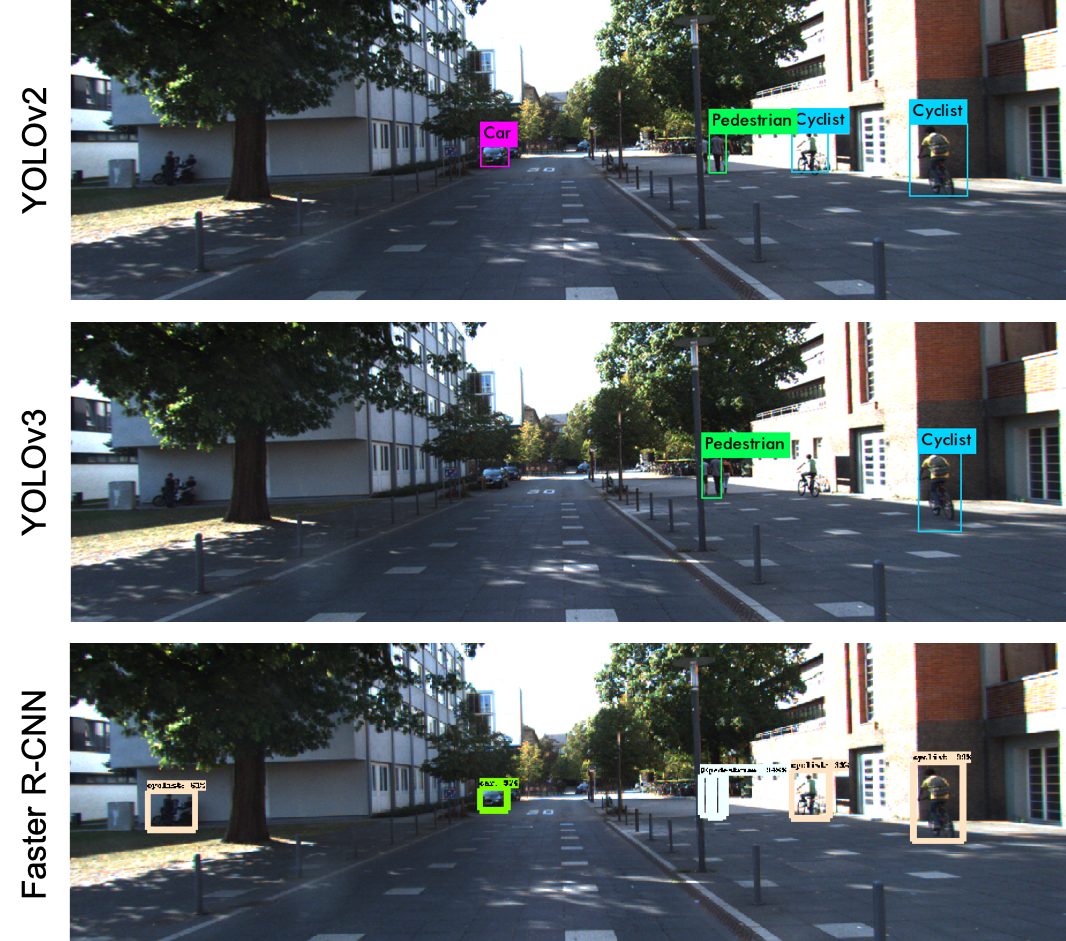
The following figure shows a result that Faster R-CNN performs much better than the two YOLO models. In this example, YOLO cannot detect the people on left-hand side and can only detect one pedestrian on the right-hand side, while Faster R-CNN can detect multiple pedestrians on the right-hand side.
Execution time analysis
I also analyze the execution time for the three models. YOLOv2 and YOLOv3 are claimed as real-time detection models so that for KITTI, they can finish object detection less than 40 ms per image. While YOLOv3 is a little bit slower than YOLOv2. However, Faster R-CNN is much slower than YOLO (although it named “faster”). Thus, Faster R-CNN cannot be used in the real-time tasks like autonomous driving although its performance is much better.
Model
Inference Time (per frame)
YOLOv2
15 ms
YOLOv3
35 ms
Faster R-CNN
2763 ms
BTW, I use NVIDIA Quadro GV100 for both training and testing.
Conclusion
I implemented three kinds of object detection models, i.e., YOLOv2, YOLOv3, and Faster R-CNN, on KITTI 2D object detection dataset. During the implementation, I did the following:
pre-processed data and labels
retrained and modified the models
inferred testing results using retrained models
evaluated the detection performance
In conclusion, Faster R-CNN performs best on KITTI dataset. However, due to slow execution speed, it cannot be used in real-time autonomous driving scenarios.
]]>Yizhou WangTrain YOLOv2 with KITTI dataset2018-07-29T00:00:00+00:002018-07-29T00:00:00+00:00https://yizhouwang.net/blog/2018/07/29/train-yolov2-kittiGitHub repository: https://github.com/yizhou-wang/darknet-kitti.
KITTI dataset contains many real-world computer vision benchmarks for autonomous driving. There are many tasks including stereo, optical flow, visual odometry, 3D object detection and 3D tracking. YOLOv2 is a popular technique for real-time object detection. There are many pre-trained weights for many current image datasets. However, YOLOv2 doesn’t perform well on KITTI object dataset. In this post, I will explain how to train YOLOv2 with KITTI object dataset and show some test results using our trained weights.
Prepare KITTI dataset
We used KITTI object 2D for training YOLO and used KITTI raw data for test. Some of the test results are recorded as the demo video above.
To simplify the labels, we combined 9 original KITTI labels into 6 classes:
Car
Van
Truck
Tram
Pedestrian
Cyclist
Need to refer the script from Zhichao.
Why is KITTI difficult to train on YOLO?
Many people tried to train YOLOv2 with KITTI dataset but often get really poor performance. This is a typical result of YOLOv2 detection without doing any modification. This is a YOLOv2 trained on 3 classes of KITTI dataset.
Why does YOLOv2 perform bad on KITTI unlike other datasets? After review the basic properties of KITTI, we can find that the shape of the images is really wide: \(1224 \times 370\). However, the default input shape of YOLOv2 is \(416 \times 416\). After this kind of resizing, the bbox of the object would because really thin, and probably result in the bad performance. Moreover, the sizes of the objects in KITTI could be various. Some of the objects could be too small to be detected.
Configuration settings
There are two ways of configuration:
Change the input shape of YOLOv2 model and disable random resizing.
Modify the resizing code in YOLOv2 source code.
Change the input shape
Open the configuration file yolov2-voc.cfg and change the following parameters:
Also, remember to change the filters in the last convolutional layer to be \(\texttt{filters} = ((\texttt{classes} + 5) \times \texttt{num})\), so that
# last convolutional layer[convolutional]filters=55
You can also refine some other parameters like learning_rate, object_scale, thresh, etc. to obtain even better results.
Our configuration file kitti6-yolov2.cfg for KITTI with 6 classes can be found HERE.
Modify the resizing code
Another way (refer to this post) is to directly modify the resizing source code in detector.cLine 69
and
Line 79
to the following:
args.w=dim*3;resize_network(nets+i,dim*3,dim);
Here, I use number 3 to represent the typical aspect ratio in KITTI dataset.
Evaluation on KITTI
The results of mAP for KITTI using original YOLOv2 with input resizing.
Benchmark
Easy
Moderate
Hard
Car
45.32%
28.42%
12.97%
Pedestrian
18.34%
13.90%
9.81%
Cyclist
8.71%
5.40%
3.02%
The results of mAP for KITTI using modified YOLOv2 without input resizing.
Benchmark
Easy
Moderate
Hard
Car
88.17%
78.70%
69.45%
Pedestrian
60.44%
43.69%
43.06%
Cyclist
55.00%
39.29%
32.58%
Test on KITTI image sequences
I wrote several new functions in darknet, which can test YOLO performance for an image sequence.
The file names of the image sequence should be listed in a txt file <namelist.txt>.